Deconstructed Delivery: Amazon Boxes into Bauhaus-Inspired Shelving
From Cardboard Chaos to Bauhaus Chic: Upcycling Amazon Boxes
We all know the feeling: the excitement of a delivery arriving, quickly followed by the looming question of what to do with the empty cardboard box. Instead of adding to the landfill, why not transform those ubiquitous Amazon boxes into something beautiful and functional? This guide will walk you through creating your own Bauhaus-inspired shelving unit, a stylish and sustainable way to organize your space.
The Bauhaus movement, with its emphasis on clean lines, geometric shapes, and functional design, provides the perfect inspiration for this upcycling project. By deconstructing the humble cardboard box and reassembling it in innovative ways, you can create a shelving system that is both aesthetically pleasing and surprisingly sturdy. Plus, it's a fantastic way to reduce waste and embrace a more eco-conscious lifestyle. So, gather your supplies, unleash your inner designer, and let's get started!
This project is not only a creative outlet but also a practical solution for anyone looking to add storage space without breaking the bank. It's a testament to the idea that beauty can be found in the most unexpected places, and that with a little ingenuity, we can transform everyday objects into something truly special.

Gathering Your Materials and Tools
Before you begin, it's essential to gather all the necessary materials and tools. This will ensure a smooth and efficient crafting process. The beauty of this project lies in its simplicity, requiring minimal and readily available resources.
Materials:
- Amazon Boxes: The quantity will depend on the size and complexity of your desired shelving unit. Aim for boxes of similar size and thickness for a more uniform look.
- Packing Tape: Strong packing tape is crucial for securely assembling the cardboard components. Clear or brown tape works equally well. Consider reinforced tape for added durability.
- Craft Knife or Box Cutter: A sharp craft knife or box cutter is essential for precise cutting and shaping of the cardboard. Always use caution and a cutting mat to protect your work surface.
- Ruler or Measuring Tape: Accurate measurements are key to achieving clean lines and a balanced design. A metal ruler or measuring tape will provide the most precise results.
- Pencil or Marker: Use a pencil or marker for marking cutting lines and design elements on the cardboard. A pencil allows for easy corrections.
- Cutting Mat: A self-healing cutting mat will protect your work surface and prolong the life of your cutting tools.
Optional Materials:
- Paint or Spray Paint: If you desire a more polished look, consider painting or spray-painting the finished shelving unit. Choose colors that complement your existing decor.
- Primer: Applying a primer before painting will help the paint adhere better to the cardboard surface.
- Sandpaper: Sandpaper can be used to smooth rough edges and create a more refined finish.
- Decorative Paper or Fabric: Add a touch of personality by covering the shelves with decorative paper or fabric.
- Glue: Wood glue or craft glue can provide extra reinforcement in certain areas.
Having all your materials organized and within reach will streamline the crafting process and allow you to focus on the creative aspects of the project.

Designing Your Bauhaus-Inspired Shelving Unit
The design phase is where your creativity can truly shine. Before you start cutting and assembling, take some time to plan the structure and aesthetics of your shelving unit. Consider the following factors:
- Available Space: Measure the area where you intend to place the shelving unit. This will help you determine the maximum dimensions of your design.
- Storage Needs: Think about what you plan to store on the shelves. This will influence the size and spacing of the shelves.
- Bauhaus Principles: Embrace the core tenets of the Bauhaus movement: simplicity, functionality, and geometric forms. Think clean lines, right angles, and modular construction.
Here are some design ideas to get you started:
- Modular Cubes: Create a series of interlocking cubes that can be arranged in various configurations. This allows for flexibility and customization.
- Stepped Shelves: Design shelves that gradually increase or decrease in height, creating a visually dynamic effect.
- Triangular Supports: Incorporate triangular cardboard supports for added stability and a distinctive Bauhaus aesthetic.
- Asymmetrical Arrangements: Experiment with asymmetrical arrangements to create a more modern and unconventional look.
Sketch out your design on paper before you begin cutting. This will help you visualize the finished product and make any necessary adjustments. Consider using a free online tool like SketchUp https://www.sketchup.com/ for a more detailed 3D model.
| Design Element | Considerations | Example |
|---|---|---|
| Shelf Depth | Based on items to be stored | 12 inches for books |
| Shelf Height | Clearance for taller objects | 15 inches for plants |
| Overall Width | Fit within available space | 36 inches maximum |
Don't be afraid to experiment and let your personal style guide your design choices. The goal is to create a shelving unit that is both functional and visually appealing, reflecting the spirit of the Bauhaus movement.
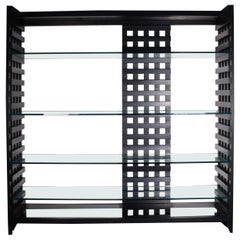
Construction and Assembly: Bringing Your Design to Life
With your design finalized and materials gathered, it's time to bring your vision to life. This stage involves carefully cutting, shaping, and assembling the cardboard components to create your Bauhaus-inspired shelving unit.
- Cutting the Cardboard: Using your ruler, measuring tape, and craft knife, carefully cut the cardboard according to your design specifications. Ensure clean, straight cuts for a professional look. Use a cutting mat to protect your work surface.
- Shaping the Components: Depending on your design, you may need to fold, score, or otherwise shape the cardboard pieces. Use a ruler to create crisp, even folds.
- Assembling the Structure: Begin assembling the main structure of the shelving unit, using packing tape to securely join the cardboard components. Apply tape generously, ensuring that all seams are well-sealed.
- Adding Supports: Reinforce the shelves and structural elements with additional cardboard supports. Triangular supports are particularly effective for providing stability.
- Finishing Touches: Once the main structure is assembled, add any finishing touches, such as decorative paper, paint, or additional reinforcement.
Tips for Success:
- Work in a well-lit area: Good lighting will improve accuracy and prevent mistakes.
- Take your time: Rushing the process can lead to errors and a less-than-perfect finished product.
- Test the stability: Before loading the shelves with items, test the stability of the unit to ensure it can support the weight.
- Reinforce weak points: If you notice any weak points, reinforce them with additional cardboard and tape.
Remember, this is a DIY project, so don't be afraid to experiment and make adjustments as needed. The most important thing is to have fun and create a shelving unit that you are proud of.
Consider using a hot glue gun for added strength, but exercise caution as the glue can be very hot.

Finishing and Display: Showcasing Your Creation
Congratulations! You've successfully transformed ordinary Amazon boxes into a stylish and functional shelving unit. Now it's time to put the finishing touches on your creation and showcase it in your home.
Painting and Decorating:
- Choose your colors: Select paint colors that complement your existing decor and reflect your personal style.
- Apply primer: Apply a primer to the cardboard surface to ensure better paint adhesion.
- Paint in thin coats: Apply several thin coats of paint, allowing each coat to dry completely before applying the next.
- Add decorative elements: Consider adding decorative paper, fabric, or stencils to personalize your shelving unit.
Displaying Your Items:
- Arrange with intention: Arrange your books, plants, and other items on the shelves in a visually appealing way.
- Consider balance: Distribute the weight evenly across the shelves to prevent the unit from becoming unstable.
- Add personal touches: Incorporate personal items that reflect your interests and personality.
- Lighting: Consider adding lighting to highlight your shelving unit and create a warm and inviting atmosphere.
Maintaining Your Shelving Unit:
- Dust regularly: Dust the shelves regularly to keep them clean and prevent buildup.
- Avoid moisture: Keep the shelving unit away from moisture to prevent warping or damage to the cardboard.
- Reinforce as needed: Periodically inspect the unit for any signs of wear and tear, and reinforce any weak points as needed.
By following these tips, you can ensure that your Bauhaus-inspired cardboard shelving unit remains a stylish and functional addition to your home for years to come. You've not only created a unique piece of furniture but also contributed to a more sustainable lifestyle by upcycling materials that would otherwise end up in the landfill.
Share your creation on social media using relevant hashtags like #BauhausDIY, #UpcycledFurniture, #AmazonBoxChallenge, and inspire others to embrace creative reuse!

So, unleash your inner architect and let those humble cardboard boxes become the foundation for something beautiful and uniquely yours!
-YourDad


Comments
Post a Comment